This tutorial will teach you how to install download, install, and testing the Arduino software( Arduino IDE) & then how to install Nutty ATmel ATmega328 Board to Arduino Software.
Now, talk about primary requirements. You need
- A PC/ Laptop (Windows, Mac, or Linux)
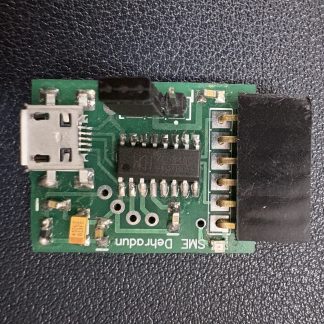
- Nutty ATmel ATmega328 Baord or any other customized board
- Arduino Programmer/ FTDI Converter
- USB Interfacing cable
Step1.
Download the Arduino Software from arduino official site & scroll down. you will see the arduino downloading option. click on “Window Installer, for window XP and up” as shown in image below. Now arduino software will start download.

Step2.
After download, install the arduino software.
Step3.
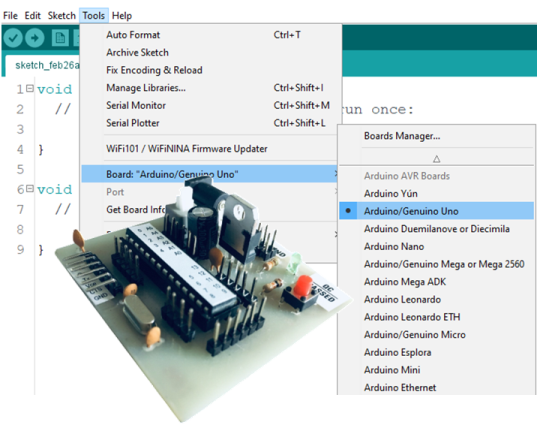
Open the Arduino IDE, & go to tools->board, Now you will see the many option for Arduino Boards. like we our Nutty ATmel Atmega328 Board, it is recommended to select “Arduino/Genuino Uno” as shows in image.

After it, this is programmer for arduino.

Connect FTDI/ CH340 programmer to your Customized board.
But be careful, you need to connect it properly as per shown below. if you connect it wrongly, then it can harm your customized board as well as your computer.


Now, go to the Tools->Port-> and select the com port as COM3.
Note: If you don’t know how to install FTDI programmer to Arduino IDE, then visit to to our another post that will show you how to install it .

and click on the upload button to upload the program .
Now, you connect led to 13 no pin (as per the Arduino pins ) of your customized board and it will start blinking.

This is how you can test your customized board.